Authors
Kazuaki Yazawa, Microsanj/Purdue University
Dustin Kendig, Microsanj
Peter E. Raad, TMX Scientific/SMU
Pavel L. Komarov, SMU
Ali Shakouri, Purdue University
Introduction
Thermoreflectance thermal imaging is an optical technique for measuring, with external illumination, the relative change in the surface reflectivity as a function of temperature for a specific sample or semiconductor device. As the temperature of the sample changes, the refractive index, and therefore, the reflectivity also changes. A first order relationship between the change in reflectivity and the change in temperature can be approximated as [1,2].
where, κ is the Thermoreflectance Coefficient
The Thermoreflectance Coefficient is a basic material property that depends on illumination wavelength, ambient temperature, material surface characteristics and, in some cases, may have some dependence on the material processing technique. For most metals and semiconductor materials of interest, the value of the Thermoreflectance Coefficient will be in the order of 10 -2/K to 10 -5/K. Thus, to detect a temperature change of 1 ºC, it is necessary to detect a reflectance change of 1 part in 100 to 1 part in 100,000. It is important therefore, to pre-obtain an accurate value for the Thermoreflectance Coefficient to achieve the best temperature resolution when doing thermal analysis on semiconductor devices. It is equally important to select an illumination wavelength that provides a Thermoreflectance Coefficient to be near the maximum value for the material being analyzed. The illumination wavelength also impacts the spatial resolution so, in some cases, a tradeoff may be warranted to achieve the desired results.
The purpose of this paper is to provide a better understanding of how κ, the Thermoreflectance Coefficient, varies with respect to:
- Material Temperature
- Device Material Properties
- Illumination Wavelength
- Optics/Microscope Numerical Aperture
Material Temperature
Compared to IR thermography, the thermoreflectance technique has the important advantage of working over a very wide temperature range. The Thermoreflectance Coefficient does have a dependence on the material temperature, but fortunately, this dependence is relatively small. As an example, the thermal performance of copper micro-vias, only a 2.7 % change in Thermoreflectance Coefficient was detected for a temperature change of approximately 200 °C. Additionally, good thermal images of gold contact layers in small devices have been obtained with sub-micron spatial resolution over temperatures ranging from 10 K to 800 K. Obviously, if the best possible precision is required, it is necessary to measure the Thermoreflectance Coefficient at operating temperatures of interest.
Material Properties
Processing Technique: For any given material, the Thermoreflectance Coefficient is not a strong function of surface preparation or the deposition process. Calibration for each device under test therefore, is generally not required. This differs from IR thermography where the emissivity can change substantially and as a result, must be calibrated each time to obtain accurate temperature data. The Thermoreflectance Coefficient of gold prepared by various thermal or e-beam evaporation techniques was measured and always showed consistent values. On the other hand, if there is a significant difference in the visual color of the material due to major microstructures, porosity variations, or surface oxidation, the Thermoreflectance Coefficient can be affected significantly.
Dielectric Coatings and Passivation Layers:Dielectric coatings or passivation layers will change the reflective properties and thus the Thermoreflectance Coefficient. Due to optical interference in thin layers, oscillations in the thermoreflectance signal can be observed. For these cases, if there are adjacent coated and uncoated regions on the sample, one can use temperature continuity on the surface to calibrate the
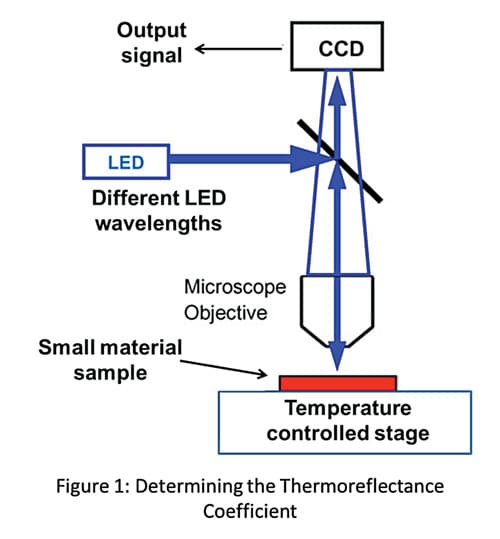
thermoreflectance coefficient. If this is not feasible, the Thermoreflectance Coefficient needs to be determined. This can be done by mounting a sample with small thermal mass on a temperature-controlled stage and measuring the change in reflected signal versus temperature (Fig. 1).
Multiple temperature cycles and averaging are necessary to obtain good signal to noise ratio. Conducting the experiment with different illumination wavelengths simplifies the analysis as optical interference peaks are shifted and one could use the envelope of the measured signal to extract the temperature profile.
Illumination Wavelength
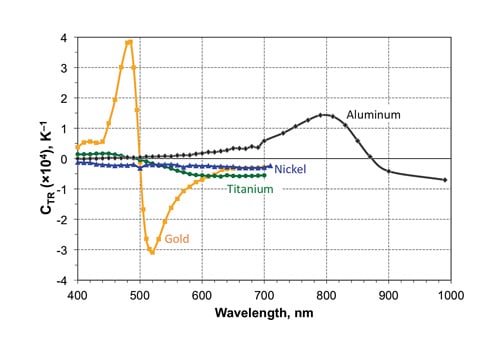
For any particular material, the Thermoreflectance Coefficient is very strongly dependent on the illumination wavelength. As illustrated in Fig. 2 [3], the Thermoreflectance Coefficient for aluminum is near zero at an illumination wavelength of 400 nm and orders of magnitude higher at 800 nm. In the case of gold, the Thermoreflectance Coefficient has a positive peak value at about 470 nm, goes to zero at about 500 nm, and exhibits a negative peak value at about 520 nm. It is therefore, very important to select the appropriate illumination wavelength for the materials being analyzed.

The following table lists the recommended LED wavelength for typical materials to obtain near optimal values of the Thermoreflectance Coefficient. Note that two alternatives are shown for gold, one for the positive peak and one for the negative peak. Two sources are also indicated for Nickel and Titanium since the peak values for both of these materials are quite broad.
For other material systems, one can easily extract the Thermoreflectance Coefficient if there is an embedded temperature sensor on the chip near the region of interest. The calibration procedure entails heating the entire chip uniformly using an external thermal stage. The thermoreflectance change across the full sample is recorded by the CCD while the temperature is measured simultaneously with the sensor. The calibration image and sensor measurements are correlated to produce values for the Thermoreflectance Coefficient for each region-of-interest on the chip.
In the absence of a temperature sensor, the Thermoreflectance Coefficient can be determined in the manner described earlier, using a sample of the chip with a small thermal mass (e.g. 1×1 mm2 up to 1×1 cm2 die) so that the temperature can be cycled.

Microscope Objective Numerical Aperture (NA):
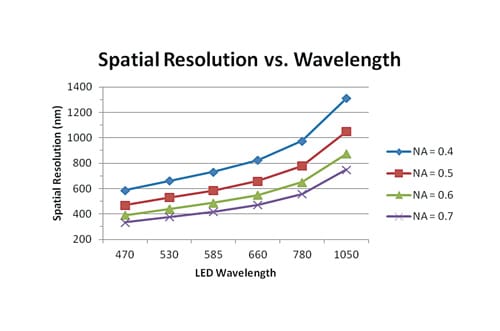
The magnitude of the Thermoreflectance Coefficient also has a dependence on the numerical aperture of the microscope objective used in the imaging [4]. This is due to the component of the light polarized perpendicular to the surface which can be non-negligible for high numerical apertures, e.g. NA > 0.5. The spatial resolution is known to be determined by the following expression:
Spatial Resolution = λ/[2∙n∙Sin(θ)]
where λ is the wavelength of the illumination source, n is the index of refraction (1.0 for air), and θ is the half-angle of the cone of light exiting the microscope lens. The component n∙sin(θ) is called the Numerical Aperture (NA) and is dependent on the optics and objectives of the microscope.
The above relationship is shown in Fig. 3 for wavelengths up to the near infrared (NIR) range.

For precise measurements of temperature distribution with a high NA lens, it is recommended to:
a) Perform measurements initially with a low NA and low magnification lens over a large area and
b) Without changing anything in the device, change the lens to higher NA and scale the temperature data accordingly.
This approach works when relatively large areas of the sample surface are available for imaging (e.g. 50-100 microns diameter). If the region of interest is very small and only visible with a high NA lens, then direct calibration on a temperature-controlled stage is necessary. Since small changes in the stage temperature can defocus the image seen by a high NA lens due to the thermal expansion of the sample, autofocusing during calibration is required.
Summary
[1] M Farzaneh, K Maize, D Luerßen, J A Summers, P M Mayer, P E Raad, K P Pipe, A Shakouri, R J Ram, and Janice A Hudgings, CCD-based thermoreflectance microscopy: principles and applications, J. Phys. D: Appl. Phys. 42, 143001-143021 (2009)
[2] G. Tessier, S. Hole, and D. Fournier. “Quantitative thermal imaging by synchronous thermoreflectance with optimized illumination wavelengths.” Applied Physics Letters 78.16 (2001): 2267-2269.
[3] P. E. Raad, P.L. Komarov, and M. G. Burzo, “Thermo-Reflectance Thermography For Submicron Temperature Measurements,” Electronics Cooling, v. 14, Feb 1, 2008
[4] S. Dilhaire, S. Grauby, and W. Claeys, “Calibration procedure for temperature measurements by thermoreflectance under high magnification conditions,”Appl. Phys. Lett. 84, 822 (2004)


