By George Meyer, Celsia Inc.
Introduction
This article is intended to offer design guidance when using heat pipes for the most prevalent types of electronics applications: mobile to embedded computing and server type applications with power dissipation ranging from 15 W to 150 W using processor die sizes between 10 mm and 30 mm square. Discussion is constrained to those conditions as guidelines provided may not necessarily apply for power electronics applications. In addition, discussion is focused on the most ubiquitous type of heat pipe, i.e. copper tube with sintered copper wick using water as the working fluid. The article is also not intended to provide detailed analysis on the proper design of heat pipes and heat sinks, but rather to offer guidance on the number and size of heat pipes used as well as to provide guidance for estimating heat sink size and determining attachment methods of the heat sink to the Printed Circuit Board (PCB). As this article does not review the fundamentals of heat pipe operation, for those readers not familiar with this technology good overviews can be found in [1-4].
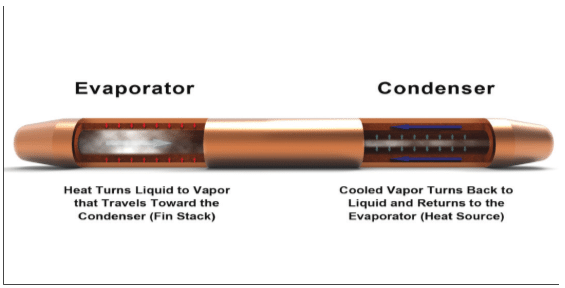
As assistance, Figure 1 serves to provide an overview of heat pipe construction and its principle of operation. A wick structure (sintered powder) is applied to the inside walls of the pipe. Liquid (usually water) is added to the device and vacuum sealed at which point the wick distributes the liquid throughout the device. As heat is applied to the evaporator area, liquid turns to vapor and moves to an area of lower pressure where it cools and returns to liquid form. Capillary action then redistributes it back to the evaporator section.
The application of heat pipes should be considered when the thermal design is either conduction limited or when non-thermal goals such as weight cannot be achieved with other materials such as solid aluminum and/or copper. The following factors need to be considered when designing heat pipes into a thermal solution:
- Effective thermal conductivity
- Internal structure
- Physical characteristics
- Heat sink
and are discussed in the following sections.
1.0 Effective Thermal Conductivity
Regularly published data for heat pipe thermal conductivity typically ranges from 10,000 to 100,000 W/m.K [4]. That is 250 to 500 times the thermal conductivity of solid copper and aluminum, respectively. However don’t rely on those figures for typical electronics applications. Unlike solid metal, the effective thermal conductivity of copper heat pipes varies tremendously with heat pipe length, and to a lesser degree with other factors such as the size of the evaporator and condenser as well as the amount of power being transported.
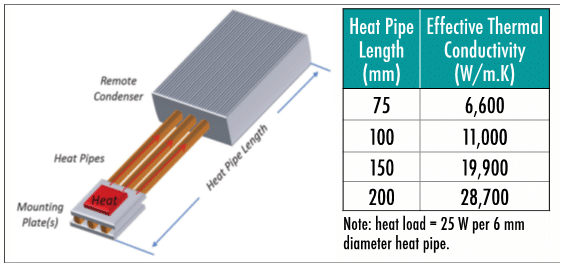
Figure 2 illustrates the effect of length on heat pipe effective thermal conductivity. In this example, three heat pipes are used to transport heat from a 75 W power source. While thermal conductivity of 10,000 W/m.K is achieved at just under 100 mm heat pipe length, a 200 mm length has less than one-third the typically published maximum thermal conductivity of 100,000 W/m.K. As observed in the calculation for effective thermal conductivity in Equation (1), the heat pipe effective length is a function of adiabatic, evaporator and condenser lengths:
Keff = Q Leff /(A ΔT) (1)
where:
Keff = Effective thermal conductivity [W/m.K]
Q = Power transported [W]
Leff = Effective length = (Levaporator + Lcondenser)/2 + Ladiabatic [m]
A = Cross-sectional area [m2]
ΔT = Temperature difference between evaporator and condenser sections [°C]
2.0 Internal Structure
Vendor specified heat pipe performance data are usually adequate for standard applications, but can be limited for specialized usage. Even when limiting the current discussion to copper/water/sintered wick versions, heat pipe customization can markedly affect operational and performance characteristics.
Changes to the internal structure of the heat pipe, most notably wick porosity and thickness, allow heat pipes to be tuned to meet specific operating parameters and performance characteristics. For instance, when a given diameter heat pipe is required to operate at higher power loads or against gravity, the capillary pressure in the wick needs to increase. For higher power handing capacities (Qmax), this means a larger pore radius. For effectively working against gravity (condenser below evaporator), this means a smaller pore radius and/or increased wick thickness. Additionally, it is possible to vary both wick thickness and porosity along the length of a single tube. Suppliers who specialize in heat pipe customization will regularly use custom formulated copper powders and/or unique mandrels to ensure the final product meets applications requirements.
Enjoying this article?
Subscribe to Electronics Cooling for practical, engineer-focused insight on today’s thermal management challenges—plus immediate access to new digital magazine issues.
Subscribe here →
3.0 Physical Characteristics
With heat pipes, size generally matters most. However, changes to outward design will degrade performance for any given heat pipe, i.e. flattening and bending, in addition to the influence of gravity.
3.1 Flattening
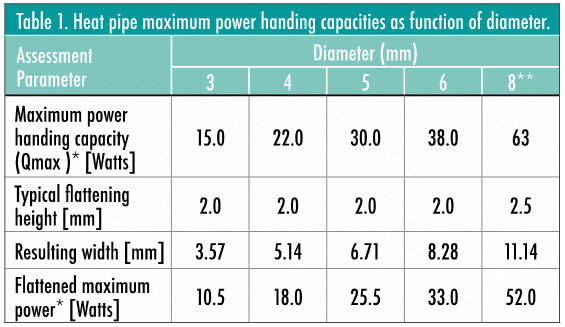
Table 1 shows the Qmax for the most common heat pipe sizes as a function of diameter. As noted earlier, Qmax may vary amongst vendors for standard heat pipes. Therefore, in order to provide like-by-like comparison between the data presented in Table 1 it is taken from a project in which the author was involved.
Typically, sintered copper heat pipes can be flattened to a maximum of between 30% to 60% of their original diameter. Some may argue that it is the lower figure that is more realistic, before the centerline starts to collapse, but it’s really a function of technique. For example, one-piece vapor chambers which begin life as a very large heat pipe can be flattened down to 90%. In this regard, the author would like to provide a rule of thumb for how much performance will degrade for every 10% decrease in thickness, but it would be irresponsible. Why? The answer comes down to how much excess vapor space is available before the heat pipe is flattened.
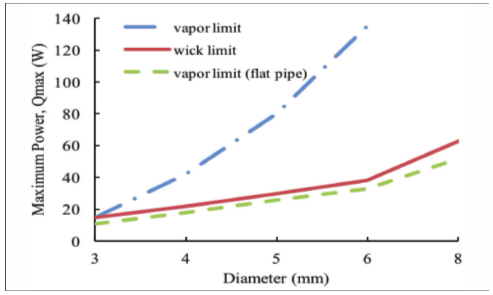
Simply put, there are two performance limits important for terrestrial heat pipe applications: the wick limit and the vapor limit. The wick limit is the ability of the wick to transport water from the condenser back to the evaporator. As mentioned, the porosity and thickness of the wick can be tuned to specific applications, allowing for changes to Qmax and/or ability to work against gravity. The vapor limit for a particular application is driven by how much space is available for the vapor to move from the evaporator to the condenser.
The wick (red) and vapor (blue) lines in Figure 3 plot the respective limits for the various heat pipe sizes shown in Table 1. It’s the lesser of these two limits that determine Qmax and as shown the vapor limit is above the wick limit, albeit only slightly for the 3 mm heat pipe. As heat pipes are flattened, the cross sectional area available for vapor to move is gradually reduced, effectively moving the vapor limit down. So long as the vapor limit is above the wick limit, Qmax remains unchanged. In this example, we’ve chosen to flatten the heat pipes to the specifications in Table 1. As seen by the flat pipe vapor limit (green dashed line) in Figure 3, the vapor limit is below the wick limit, reducing the Qmax. Flattening the 3 mm by only 33% causes the vapor limit to become the determining factor whereas the 8 mm pipe needed to be flattened by over 60% for this to happen.
3.2 Bending
Bending the heat pipe will also affect the maximum power handling capacity, for which the following rules of thumb should be kept in mind. First, minimum bend radius is three times the diameter of the heat pipe. Second, every 45 degree bend will reduce Qmax by about 2.5%. From Table 1, an 8 mm heat pipe, when flattened to 2.5mm, has a Qmax of 52 W. Bending it 90 degrees would result in a further 5% reduction. The new Qmax would be 52 – 2.55 = 49.45 W. Further information on the influence of bending on heat pipe performance is given in [5].
3.3 Working against gravity
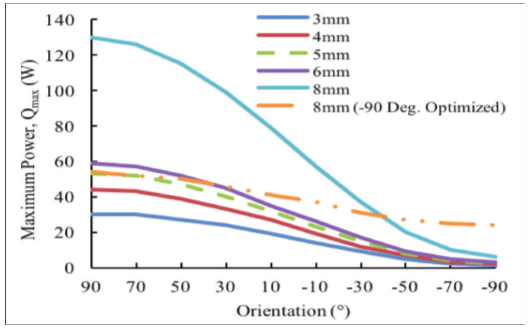
Figure 4 illustrates how the relative position of evaporator to condenser can affect both Qmax and heat pipe selection. In each case, Qmax is reduced by approximately 95% from one orientation extreme to the next. In situations where the condenser must be place below the evaporator, a sintered material is used to allow for smaller pore radius and/or increase the wick thickness. For instance, if an 8 mm heat pipe is optimized for use against gravity (-90°), its Qmax can be increased from 6 W to 25 W.
4.0 Heat Pipe Selection
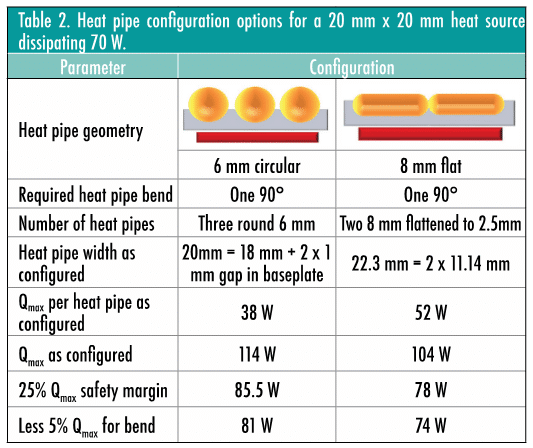
The following example, summarized in Table 2, is presented to illustrate how heat pipes might be used to solve a thermal challenge for 70 W heat source with dimensions 20 mm x 20mm and a single 90 degree heat pipe bend required to transport heat from evaporator to condenser. Furthermore, the heat pipes will operate in a horizontal position.
To be at their most effective, heat pipes need to fully cover the heat source, which in this case is 20 mm wide. From Table 1, it appears that there are two choices: three round 6 mm pipes or two flattened 8 mm pipes. Remember the three 6 mm configuration will be placed in a mounting block with 1 to 2 mm between the heat pipes.
Heat pipes can be used in conjunction to share the heat load. The 6 mm configuration has a Qmax of 114W (3 x 38 W), while the flattened 8 mm configuration has a Qmax of 104 W (2 x 52 W).
It’s just good design practice to build in a safety margin, and it is suggested to typically use 75% of rated Qmax. Therefore select 85.5W for the 6 mm (75% x 104 W) and 78 W for the 8 mm (75% x 104 W)
Finally the influence of bending needs to be accounted for. A 90 degree bend will reduce Qmax of each configuration by another 5%. The resulting Qmax for the 6 mm configuration is therefore just over 81 W and for the 8 mm configuration it is 74 W, both of which are higher than the 70 W heat source that is to be cooled.
As can be seen from this analysis, both heat pipe configurations are adequate to transport heat from the evaporator to the condenser. So why choose one over the other? From a mechanical perspective it may simply come down to heat sink stack height at the evaporator, i.e. the 8 mm configuration has a lower profile than does the 6mm configuration. Conversely, condenser efficiency may be improved by having heat input in three locations versus two locations, necessitating the use of the 6 mm configuration.
5.0 Heat Sinks
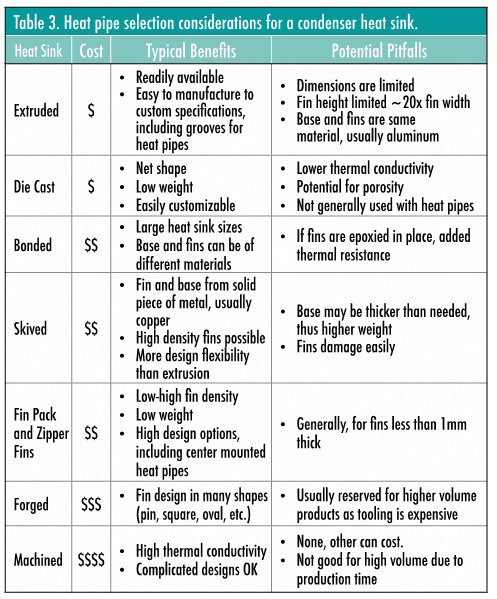
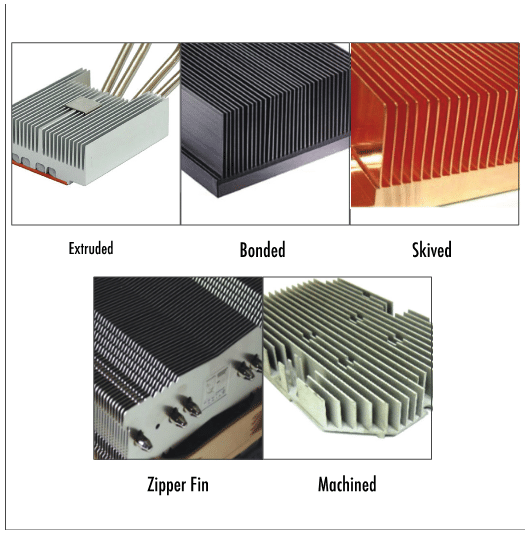
There are numerous choices from zipper pack fins to extruded fin stacks, each with their own cost and performance characteristics. While heat sink choice can markedly affect heat dissipation performance, the biggest performance boost for any type of heat exchanger comes with forced convection. Table 3 compares the benefits and pitfalls for range of heat sinks, some of which are illustrated in Figure 5.
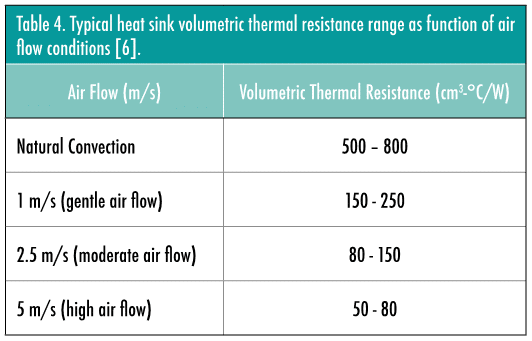
As a starting point for determining heat sink selection, Equation (2) can be used to estimate the required heat sink volume for a given application:
V= Q Rv/ ΔT (2)
where: V= heat sink volume [cm3], Q = heat to be dissipated [W], Rv = volumetric thermal resistance [cm3–°C/W], ΔT = maximum allowable temperature difference [°C].
Table 4 provides guidance on the range of heat sink volumetric thermal resistances as a function of air flow conditions.
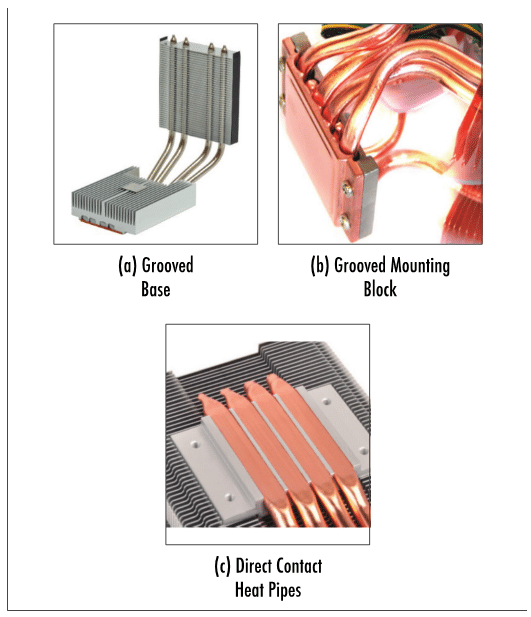
Whether dealing with a heat exchanger that is local or remote to the heat source, the options for mating heat pipes to them are identical and include grooved base, grooved mounting block and direct contact methods as illustrated in Figure 6.
It should go without saying that simply soldering a round pipe to a flat surface is far from optimal. Circular or semi-circular grooves should be extruded or machined into the heat sink. It’s advisable to size the grooves about 0.1 mm larger than the diameter of the heat pipe in order to allow enough room for the solder.
The heat sink shown in Figure 6(a) uses both a local and remote heat sink. The extruded heat exchanger is designed to accommodate slightly flattened heat pipes, helping to maximize the contact between the copper mounting plate and the heat source. A remote stamped fin pack is used to further increase thermal performance. These types of heat exchanger are particularly useful because the pipes can run directly through the center of the stack, decreasing conduction loss across the fin length. Because no base plate is required with this fin type, weight and cost can be reduced. Again the holes through which the heat pipes are mounted should be 0.1 mm larger than the pipe diameter. Had the pipe been completely round at the heat source, a thicker grooved mounting plate would have been required as seen in Figure 6(b)
If conduction losses due to the base plate and extra TIM layer are still unacceptable, further flatting and machining of the heat pipes allows direct contact with the heat source as seen in Figure 6(c). Performance gains from this configuration usually lead to between a 2-8 °C reduction in temperature rise. In cases where direct contact of the heat source to the heat pipes is required a vapor chamber, which can also be mounted directly, should be considered due to its improved heat spreading capacity.
The primary reason for considering a heat pipe solution is improved performance. As such, the use of thermal tape or epoxy as the primary means of attaching the heat sink to the die is not suitable. Instead three types of mechanical attachments are often used with heat pipes; all of which can meet MIL-810 and NEBS Level 3 shock and vibration requirements.
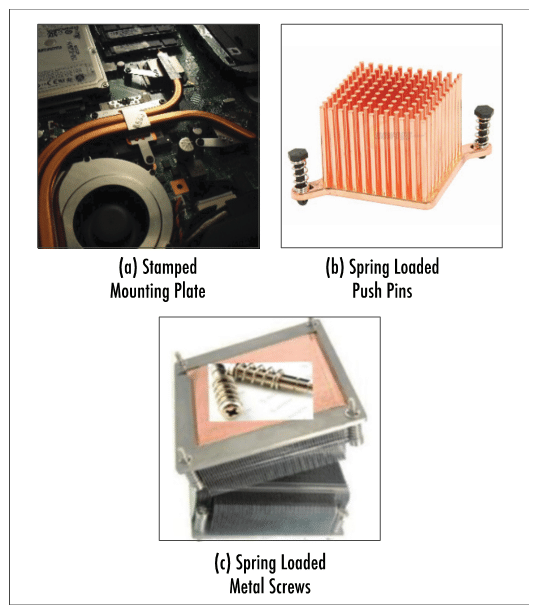
Finally, typical heat pipe attachment methods for small (low mass) heat sinks are shown in Figure 7. In Figure 7(a) a stamped mounting plate is shown. Although it requires two PCB holes, this method offers better shock and vibration protection relative to thermal tape or epoxy, and some TIM compressions – with up to 35 Pa compression required. Figure 7(b) shows spring loaded plastic or steel push pins further increase TIM compression up to around 70 Pa. Installation is fast and simple but removal requires access to the back of the PCB. Push pins should not be considered for anything more than light duty shock and vibe requirements. Spring loaded metal screws, Figure 7(c), offer the highest degree of shock and vibration protection as they are the most secure method of attaching a heat sink to the die and PCB. They offer the highest TIM preload at approximately (520 Pa).
Summary
Design guidance was provided on the use copper tube heat pipes with sintered copper wick using water as the working fluid. As outlined, heat pipe selection needs to consider a range of factors including effective thermal conductivity, internal structure and physical characteristics, in addition to the heat sink characteristics.
References
[1] Garner, S.D., “Heat Pipes for Electronics Cooling Applications,” ElectronicsCooling, September 1996, https://electronics-cooling.com/1996/09/heat-pipes-for-electronics-cooling-applications/, accessed August 15, 2016.
[2] Graebner, J.E., “Heat Pipe Fundamentals,” ElectronicsCooling, June 1999, https://electronics-cooling.com/1999/05/heat-pipe-fundamentals/, accessed August 15, 2016.
[3] Zaghdoudi, M.C., “Use of Heat Pipe Cooling Systems in the Electronics Industry,” ElectronicsCooling, December 2004, https://electronics-cooling.com/2004/11/use-of-heat-pipe-cooling-systems-in-the-electronics-industry/, accessed August 15, 2016.
[4] Peterson, G.P., An Introduction to Heat Pipes: Modeling, Testing and Applications, John Wiley & Sons, New York, US, (1994).
[5] Meyer, G., “How Does Bending Affect Heat Pipe & Vapor Chamber Performance?” November, 2015, http://celsiainc.com/blog-how-does-bending-affect-heat-pipe-vapor-chamber-performance/, accessed August 15, 2016.
[6] Meyer, G., “Design Considerations When Using Heat Pipes (Pt. 2),” August 2016, http://celsiainc.com/design-considerations-when-using-heat-pipes-pt-2/, accessed August 15, 2016.
George Meyer is a thermal industry veteran with over three decades of experience in electronics thermal management. He currently serves as the CEO of Celsia Inc., a design and manufacturing company specializing in custom heat sink assemblies using heat pipes and vapor chambers. Previously, Mr. Meyer spent twenty-eight years with Thermacore in various executive roles including Chairman of the company’s Taiwan operations. He holds over 70 patents in heat sink and heat pipe technologies and serves as a chairperson for both Semi-Therm and IMAPS thermal conferences in the San Francisco area.
Contact Information:
George Meyer
CEO
Celsia Inc
3287 Kifer Road, Santa Clara CA, 95051

