Jesse Galloway and Ted Okpe
Amkor Technology
One of the more challenging thermal resistance measurements to make for electronic packages is the junction-to-case resistance called Theta jc. The equation for Theta jc, equation (1), is straightforward. However, the difficulty lies in making an accurate case temperature, Tc, without affecting the junction temperature, Tj, and the flow of heat, Pth, into the cold plate.
For uniform power distribution, Theta jc is calculated by taking the difference between the junction and the case temperature, all measured at the center of the package, divided by the power flowing into the cold plate. In reality, the case temperature cannot be measured without disturbing the heat flow once a sensor is inserted between the case and the cold plate as shown in Figure 1.

This shortcoming may be resolved for packages that have a predominate heat flow path. For example, heat flows at least 90% from the die to the copper slug in an exposed pad thin quad flat pack (eTQFP) package. A transient method was proposed by [1] as a means for measuring Theta jc without having to measure the case temperature. A JEDEC standard, JESD51-14 [2], summarizes the method for measuring Theta jc using a transient method. For packages such as a plastic ball grid array (PBGA) and flip chip ball grid array (FCBGA) packages, heat flow is multidirectional. Hence a direct application of the transient standard [2] may not be appropriate.
The JEDEC JC-15 thermal standards committee has devoted a considerable amount of time discussing ways to overcome difficulties in making steady-state Theta jc measurements. At this time it has not reached a consensus for writing a standard. The purpose of this study was not to propose a steady-state Theta jc standard but to document how the design of the cold plate and case temperature sensor affects Theta jc measurements and to make general recommendations on the benefits of one method compare to another.
Experimental measurements were made using a 23mm x 23mm body plastic ball grid array (PBGA) package. Four different samples were tested, P1, P2, P3 and P4. A 40mm flip chip ball grid array (FCBGA) package was also tested using four different samples, F2, F3, F4 and F5. A summary of the package dimensions are given in Table 1. Both packages were fabricated using thermal die equipped with heaters. A uniform power distribution was applied to the active surface of the die. Each die had a temperature sensor located at its center. The PBGA package had a mold cap thickness of 1.17mm with a die thickness of 0.3mm. The FCBGA package was constructed using a single piece copper lid with a 1.0mm thickness. Approximately 100W was applied to the FCBGA while approximately 8W was applied to the PBGA package. The measured Theta jc differed by as much as 300% depending on which method was used to measure the case temperature.
Four different cold plate designs were developed to measure Theta jc. In all cases, the same water cooled cold plate design was used to remove heat from the devices under test. The first design used a spring loaded thermocouple (36 gauge type K) positioned normal to the surface of the package inserted directly through the cold plate in between cooling channels. A spring was used to create a compressive force driving the thermocouple bead against the case surface with a force of approximately 1.5N. The second design used an embedded thermocouple (36 gauge type K) mounted parallel to the surface of the package inside a 5mm thick copper reference plate. This reference plate made contact to the same cold plate design that was used for the contact thermocouple test. A 1.5mm hole was drilled in the center of the reference plate, filled with silver epoxy, the thermocouple was inserted to the end of the hole and the epoxy was cured. The third design glued the thermocouple bead to the case surface at its center using silver filled epoxy. A 1.5mm wide x 1.0mm deep groove was machined into the surface of the 5mm copper reference plate to provide an escape path for the thermocouple leads. Again the same cold plate was used to remove heat from the device under test. The fourth design used a fine focus infrared camera having a spot size of 1mm. The cold plate was modified to create a cone-shaped optical access port to view the surface. A 2.0 mm hole was exposed at the cold plate surface and extends backward at a 35 degree cone angle. For all methods, the thermocouples and IR camera were calibrated against a known standard over a temperature range from 30C to 50C. Each method had relative merits and drawbacks as outlined in Table 1.
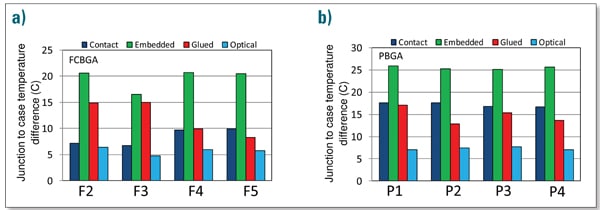
The temperature rise between the die and the case were plotted in Figure 2(a) for the FCBGA packages and Figure 2(b) for the PBGA packages. The contact and optical methods had a similar temperature junction-to-case temperature difference. In comparison, the glued and the embedded thermocouple junction-to-case temperature differences were larger. Epoxy covered the glued thermocouple bead with an effective bead diameter of approximately 0.4mm. It senses not only the case temperature but also the TIM II temperature. There was more part-to-part variation in temperature difference for the glued thermocouple method compared to other methods. The embedded thermocouple is isolated from the case by a TIM II layer. As a consequence, the glued thermocouple and the embedded thermocouple measured case temperatures will be lower than the actual case temperature.

The optical cold plate design, with a larger hole in the center, affects the conduction flow path to a greater extent compared to the other cold plate designs. Heat flowing from the die to the case center location must spread laterally. For the PBGA package, the case temperature is artificially raised as a consequence since heat does not spread as efficiently through the lower conductivity mold compound (k ~ 1.0W/m/k). The corresponding junction-to-case temperature difference was smaller for the PBGA package tested using the optical cold plate. The glued and the contact thermocouple gave similar temperature differences. At the smaller power level applied to the PBGA packages, the temperature gradient through the TIM II layer was smaller hence the glued thermocouple error was also smaller. Just as was observed for the FCBGA package, the embedded thermocouple design gave the highest temperature difference for the PBGA package due to the extra TIM II layer separating the sense location and the actual case surface.

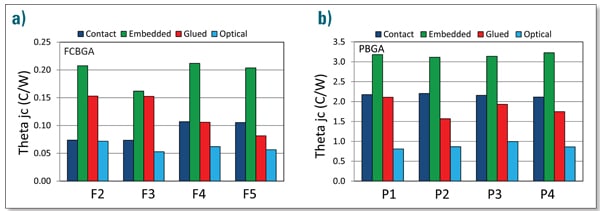
Using temperature data reported in Figures 2a and 2b and power data, the measured Theta jc data were calculated using equation 1 and plotted in Figure 3. There was a considerable difference in the Theta jc data depending on which method was employed. The highest Theta jc values were recorded for the embedded TC method and the lowest with the optical method. The optical and contact methods gave similar results for the FCBGA package. The contact and the glued thermocouple gave similar results for the PBGA package.

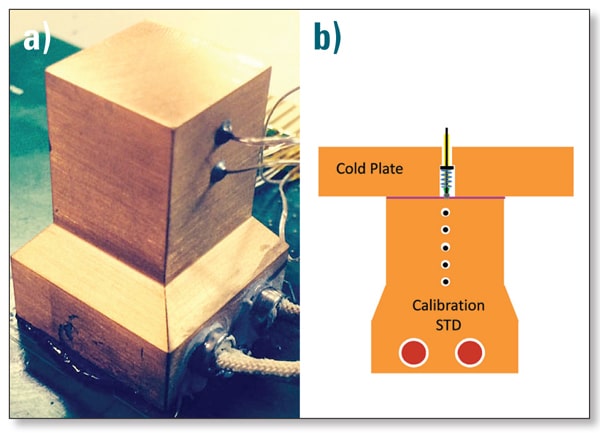
In order to determine which method provided the more accurate case temperature measurement, a calibration standard was developed to measure errors in reading the surface temperature. The calibration standard consisted of a calorimeter bar instrumented with five thermocouples, equally spaced at 2.5mm intervals along the center line of the bar, see Figures 4a and 4b. Note that two thermocouples are visible in Figure 4a. There are three more thermocouples mounted on the opposite side that are not visible in this picture. Two cartridge heaters supplied power to the base of the standard. The FCBGA case temperature standard was machined from oxygen free copper, thermal conductivity of 395W/m/k, to enable higher power testing. The PBGA case temperature standard was machined from hastelloy, a low thermal conductivity material (10W/m/k). It enabled greater temperature difference to be read at a lower power level that was used to test PBGA packages.
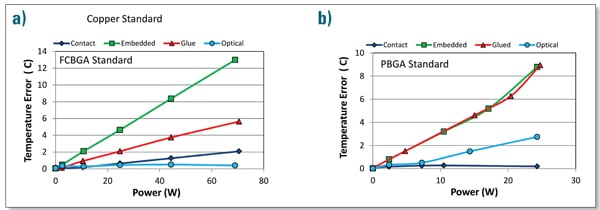
The case temperature was determined by extrapolating the temperature gradient to the upper surface. The linearity of temperature versus thermocouple position was quite good resulting in an R2 fit typically greater than 0.999. Each individual case temperature method was compared to the standard value using a setup shown in Figure 4b. The standard was tested following the same method that was used to test the PBGA and FCBGA packages. The case temperature error was calculated as the difference between the extrapolated surface temperature and the measured case temperature. The temperature error was plotted in Figure 5 as a function of the applied power. Greater corrections are required for the embedded thermocouple method compared to the other methods. The contact method required the least amount of correction.

Generally speaking, methods that required large temperature corrections created greater uncertainty in the final Theta jc measurement. Therefore, both the embedded and the glued thermocouple methods should be avoided in measuring Theta jc. The embedded method was dependent on the TIM II thermal resistance. The glued thermocouple method was dependent on the type of epoxy used to glue it to the case and the skill of the technician in attaching it. Both the contact thermocouple method and the optical method require additional investigation to determine which method is preferable. The contact thermocouple method had several advantages including the instrumentation were lower cost and were more readily available. It also did not require a larger hole in the center of the heat sink as was required for the optical method. The optical method had the advantage of providing a true case temperature measurement. Additional work is planned using finite element analysis to understand the interaction between the temperature sensor and the case surface including the effects of the cold plate design.
CONCLUSIONS
- Theta jc data were dependent on the cold plate design and the temperature sensor used to measure the case temperature.
- Theta jc data for PBGA and FCBGA packages may vary by more than 300% depending on the cold plate design and temperature sensor.
- A calibration standard was presented as a means for determining which method provided the more accurate case temperature.
- The optical and contact case temperature methods require less case temperature correction.
- The optical and contact case methods should be explored further to understand which method provides the more reliable and accurate case temperature measurement with less impact on the heat flow from the package.
REFERENCES
[1] D. Schweitzer, “Transient Dual Interface Measurement of the Rth-JC of Power Semiconductor Packages”, ElectronicsCooling, Vol. 16, No. 3, 2010.
[2] JEDEC Standard JESD51-14, “Transient dual interface test method for the measurement of the thermal resistance junction-to-case of semiconductor devices with heat flow through single path”, November 2010, http://www.jedec.org/standards-documents/results/JESD51-14.


