Surface flatness is an important issue for thermal designers as it is directly related to thermal contact resistance between surfaces. In this column, the definitions of surface flatness related parameters are discussed. These definitions are presented here as in the ASME B46.1-1995 standard [1].
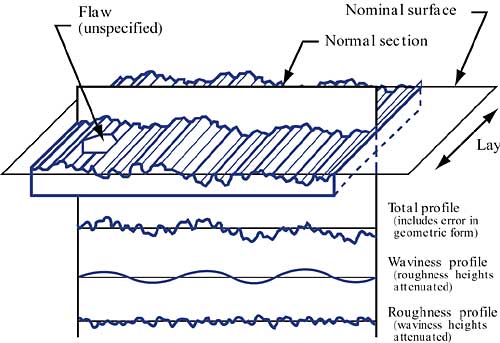
Surfaces are characterized by three main parameters: roughness, waviness, and lay. Roughness means the irregularities of a surface, usually resulting from a production process or usage, such as machining or wear. These irregularities are typically submicron in scale. Waviness describes a more widely spaced component on the surface, with larger dimensions; for instance, the deviation from flatness. So, thinking analogously, waviness is a kind of carrier wave and roughness is the modulation over it. Lay is defined as the main direction of the surface texture. This is often determined by the production method, such as the direction of grinding. These surface characteristics are depicted schematically in Figure 1.
 |
Figure 1. Schematic representation of lay, waviness, and roughness [1].The surface smoothness is typically measured by mechanical profilometers that use a diamond stylus run over the surface. Also optical methods are in use, and the most advanced profilometers use atomic force microscopy. From the measurement data, waviness and roughness are separated by filtering, and the roughness parameters are calculated by statistical means. The most often used roughness parameters are the average roughness, Ra, and the root-mean-square roughness Rq. The average roughness is defined as the sum of the areas above and below the mean surface line, divided by the length of the measurement line. Mathematically this is expressed in Equation 1:
 |
Here y is the dimension vertical to the surface, and l is the measurement length, in the direction of surface, defined by x.
Root-mean-square roughness, Rq , is the value obtained by the root-mean square calculation of the surface profile values, and it is presented in Equation 2.
 |
From a statistical point of view, both Ra and Rq are deviation types of parameters. Therefore, their unit is of the type [length], such as �m.
Less frequently used roughness parameters are core roughness depth, Rk , which is the depth of so called roughness core profile, and roughness kurtosis, Rku, which indicates the shape of the peak height distribution.
Some typical average roughness values for different surface processing methods appear in Table 1. As roughness is strongly case dependent, the table is only meant to illustrate the order of magnitude of the values.
Table 1. Typical Average Roughness Values
|
References
- ASME B46.1-1995 : “Surface Texture (Surface Roughness, Waviness, and Lay): An American National Standard.” American Society of Mechanical Engineers, New York, 1996


